

How Often Should You Descale an Espresso Machine?
Yes, you need to descale your espresso machine, and the standard starting point is every 2 to 3 months, adjusted for how hard your water is and how often you brew. Use food-grade citric acid or a commercial citric-based espresso descaler. Skip vinegar and household descalers entirely. If your machine has a built-in descale program, follow the manufacturer’s steps first, since those are calibrated to your exact model.
Here’s the short version before we get into the details:
- Cadence: Every 2 to 3 months for most home users, more often with hard water or heavy use.
- What to use: Food-grade citric acid or a commercial citric-based descaler.
- What to avoid: Vinegar, CLR, bleach, or generic household descalers.
- Check first: Your owner’s manual, especially if your machine has a built-in descale cycle.
Mineral scale from minerals like calcium and magnesium builds up inside boilers, heating elements, and internal tubing over time when using tap water. Left alone, it restricts flow, weakens steam pressure, and destabilizes brew temperature, which is why a $40 bag of citric acid or a bottle of descaler is one of the cheapest insurance policies you can buy for a machine that costs hundreds of dollars.
Key Takeaways
Descaling cadence should track your measured water hardness, not a generic calendar rule, and citric acid or a commercial descaler is the only chemistry worth trusting.
| Point | Details |
|---|---|
| Set cadence by water hardness | Test hardness first, then descale every 6 weeks to 4 months depending on the result. |
| Use citric acid or commercial descaler | Mix citric acid at about 30 grams per liter, or use a citric-based commercial product. |
| Never use vinegar or household descalers | Vinegar leaves lingering odors and household descalers aren’t formulated for food contact. |
| Rinse at least twice before brewing | Run two to three full tanks through every circuit and taste-test a discard shot. |
| Separate cleaning from descaling | Backflush with a product like Font-mag’s Cafiza for coffee oils; descale separately for mineral scale. |
Table of Contents
- How to Descale an Espresso Machine Step by Step
- How Often Should You Descale, and What Are the Warning Signs?
- Which Descaling Solution Should You Use?
- Do Built-In Descale Programs Change the Process?
- How Do You Rinse and Confirm the Machine Is Clean?
- What Mistakes Ruin a Descaling Cycle?
- How Can You Reduce How Often You Need to Descale?
- What People Get Wrong About Descaling
- Keep Your Whole Beverage Setup Running Clean
- Sources
How to Descale an Espresso Machine Step by Step
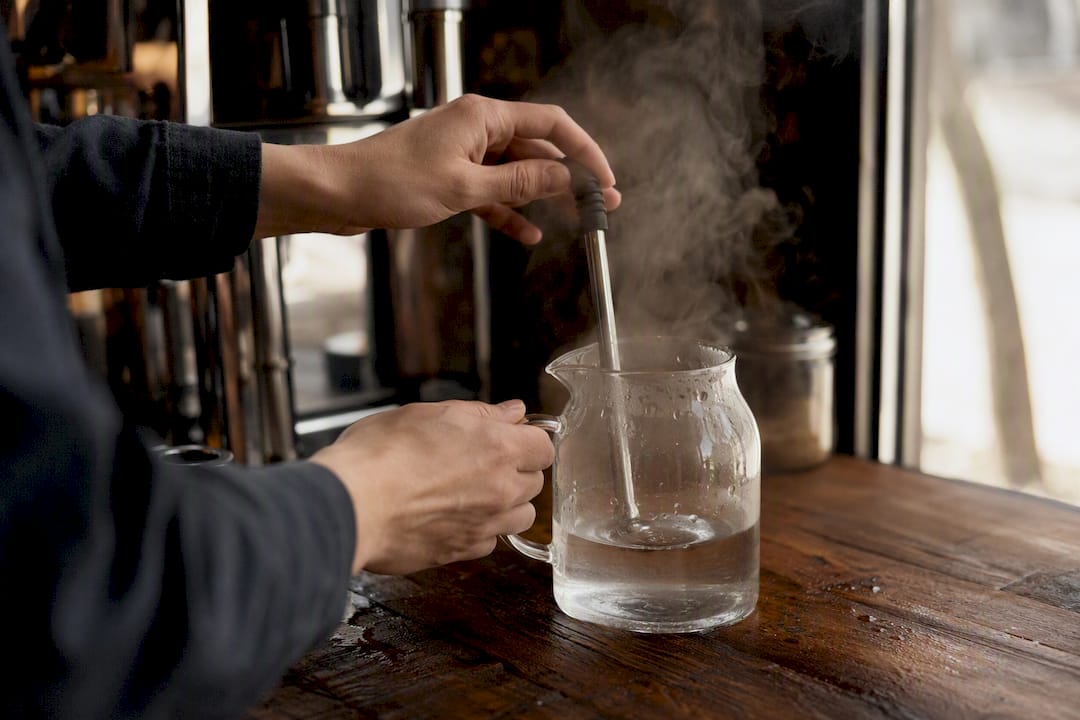
Espresso machine descaling follows the same basic logic across most home models: dissolve the scale with an acidic solution, give it time to work, flush it out completely. The details vary by machine, but this sequence covers single-boiler, thermoblock, and most semi-automatic setups.
- Empty and prep the tank. Remove the water filter if your machine uses one (citric acid can degrade some filter cartridges), and dump any remaining water.
- Mix your solution. For citric acid, that’s roughly 30 grams (about two heaped tablespoons) per liter of water, a ratio widely recommended for home machines. For a commercial descaler, follow the bottle’s dilution ratio exactly.
- Run it through the brew circuit. Pour the solution into the tank and run it through the group head in measured pulls, roughly a cup at a time, then let it sit in the boiler for 10 to 15 minutes before running the next batch.
- Cycle the steam wand and hot water spout. Run several short bursts of the solution through both, since scale builds up in these passages just as much as the brew line.
- Repeat until the tank is used. Most guides recommend running the full mixed batch through in stages rather than dumping it all at once, so every internal passage gets contact time.
- Drain completely, then move straight to rinsing.
- Rinse with at least two full tanks of fresh water, running it through the group head, steam wand, and hot water outlet each time. Insufficient rinsing is the single most common mistake people make after descaling.
- Pull a throwaway shot. Discard it, then pull a real one and taste for anything metallic, sour, or off.
Pro Tip: Keep a small notebook or phone note logging the date of each descale. When you notice your shots slowing down three weeks earlier than last cycle, that’s your water hardness talking, not your imagination.
If your flow rate and steam power come back strong and the shot tastes clean, you’re done. If not, that usually points to either an incomplete rinse or scale that had already hardened past what a single descale cycle can dissolve.
How Often Should You Descale, and What Are the Warning Signs?
Water hardness drives your real interval more than any calendar reminder does. Testing your water with an inexpensive strip or a TDS meter and setting your schedule around that number beats guessing every time.
- Soft water (below 60 mg/L calcium carbonate): Every 3 to 4 months for typical daily use.
- Moderate water (60 to 120 mg/L): Every 2 to 3 months.
- Hard water (above 120 mg/L): Monthly to every 6 weeks, sometimes sooner.
If your machine has a descale light or alert, trust it as a baseline. But those alerts usually run on shot counts or a fixed timer, not your actual water chemistry, so a hardness test strip is worth the $10 if you want a number instead of a guess.
Watch for these symptoms between scheduled descales: noticeably slower extraction, steam that used to froth milk in 20 seconds now taking twice as long, a longer heat-up time before the ready light comes on, and any sour or flat taste that wasn’t there last week. Any two of these together usually mean scale, not a grind or dose problem.
Which Descaling Solution Should You Use?
Food-grade citric acid is the cheapest, safest option for most home machines. Mixed at about 30 grams per liter, it’s an effective and food-safe descaling chemistry that dissolves calcium and magnesium scale without leaving the lingering odor problems vinegar causes. A bag lasts through several descaling cycles and costs a fraction of pre-mixed commercial bottles.

Commercial citric-based descalers, the kind formulated specifically for espresso machines and similar to what you’d find under brands like Urnex or Durgol, cost more per use but take the guesswork out of dilution ratios. If you’re not confident measuring citric acid by weight, or your machine’s manual specifies a particular concentration, a commercial descaler is the safer default.
What you should never reach for:
- Vinegar. It’s acidic enough to dissolve scale, but it tends to leave a persistent smell and taste behind that citric acid simply doesn’t, and it can be harder on rubber seals over repeated use.
- CLR or other household descalers. These are formulated for pipes and appliances, not food-contact surfaces, and they’re not built to rinse as cleanly.
- Bleach. Never. It’s a sanitizer, not a descaler, and it has no business anywhere near your boiler.
A handful of manufacturers, particularly some machines with aluminum boilers, specify lactic acid instead of citric acid because citric acid can react differently with aluminum over time. Always check your manual before assuming citric acid is universally safe for your specific boiler material.
Do Built-In Descale Programs Change the Process?
If your machine has a built-in descale routine, use it. Brands like Breville/Sage, De’Longhi, and Jura build multi-phase programs that control the exact volumes and soak times your specific model needs, and they often reset an internal usage counter when you finish. That’s a better result than eyeballing it manually.
For single-boiler machines with a PID controller or a thermoblock heating system, the general manual method above applies with no real modification.
- Dual-boiler and heat-exchanger machines need their brew and steam circuits treated as separate systems: descale the brew side fully first, then run a complete cycle through the steam boiler, rinsing both thoroughly afterward.
- Machines with saturated group heads or complex plumbing sometimes trap scale in spots a standard cycle won’t reach.
- Call a technician if you’re descaling a machine that’s gone a year or more without maintenance, if symptoms persist after two correct descale cycles, or if you own a prosumer machine with a saturated group and you’re not confident opening it up.
How Do You Rinse and Confirm the Machine Is Clean?
Rinsing isn’t an afterthought, it’s half the job. Skip it or shortcut it, and you’ll taste the consequences in every cup for a week.
- Run at least two full tanks of plain water through the group head, steam wand, and hot water spout. If you used a commercial descaler with added surfactants, run a third tank to be safe.
- Smell the water coming out on the final rinse. Any citrus or chemical scent means you’re not done.
- Pull a discard shot and taste it specifically for metallic, sour, or soapy notes.
- If anything tastes off, rinse again with another full tank rather than repeating the descale itself.
Professional cafés often run three or four rinse tanks after a descale precisely because residual taste is the most common complaint when a home user skips straight from descaling solution to their morning shot. Don’t repeat the acid cycle to fix a taste problem. That’s a rinsing problem, not a scaling one.
What Mistakes Ruin a Descaling Cycle?
The most common failure isn’t using the wrong product, it’s rushing the process. Here’s what trips people up:
- Forgetting to remove the water filter before running acid through the tank, which can degrade the cartridge.
- Cutting soak time short. Ten minutes of contact time matters more than how many times you cycle the solution through.
- Under-rinsing, by far the leading cause of lingering chemical taste in the first few shots after descaling.
- Reaching for vinegar or a household descaler because it’s what’s under the sink, when neither is formulated for food-contact appliance use.
Over-descaling is a real but less obvious mistake. Running acid through your machine every two weeks “just to be safe” doesn’t protect anything. It accelerates wear on rubber seals and gaskets over time. Stick to the concentration your descaler recommends and the interval your water hardness actually supports.
Pro Tip: If flow and steam performance don’t improve after a correctly executed descale and thorough rinse, stop. That’s a sign of a different problem, a worn gasket, a clogged shower screen, or a failing pump, and running another aggressive descale cycle won’t fix it.
How Can You Reduce How Often You Need to Descale?
The easiest way to descale less often is to change what goes into the tank in the first place.
- Use filtered or low-mineral water, and replace cartridge filters on the schedule the manufacturer recommends, not when you remember to.
- Consider an in-tank softener if your local water tests hard and a full filtration setup isn’t practical.
- Test your water hardness once, then set a calendar reminder matched to that number instead of a generic three-month guess.
- Separate cleaning from descaling. Backflushing your group head with a detergent like Cafiza removes coffee oils and residue, which is a different job from dissolving mineral scale, and both need to happen on their own schedules.
Where Font-mag’s Resources Fit Into Your Maintenance Routine
This article was written by Rosario, an editorial contributor covering home coffee equipment and brewing practices for Font-mag.
- Font-mag stocks Cafiza cleaner for group-head backflushing and a dedicated Cafiza grinder cleaner for residue that can mimic descaling symptoms.
- For broader home-barista context, see Font-mag’s guide on why espresso is concentrated coffee.
What People Get Wrong About Descaling
Most advice on this topic treats descaling like an oil change: same interval, every machine, no exceptions. That’s backwards. A machine running softened water in a low-mineral region can go four months between descales, while the same model on well water in a hard-water region needs it monthly. The calendar reminder everyone recommends is a placeholder for a number you could just measure with a $10 test strip.
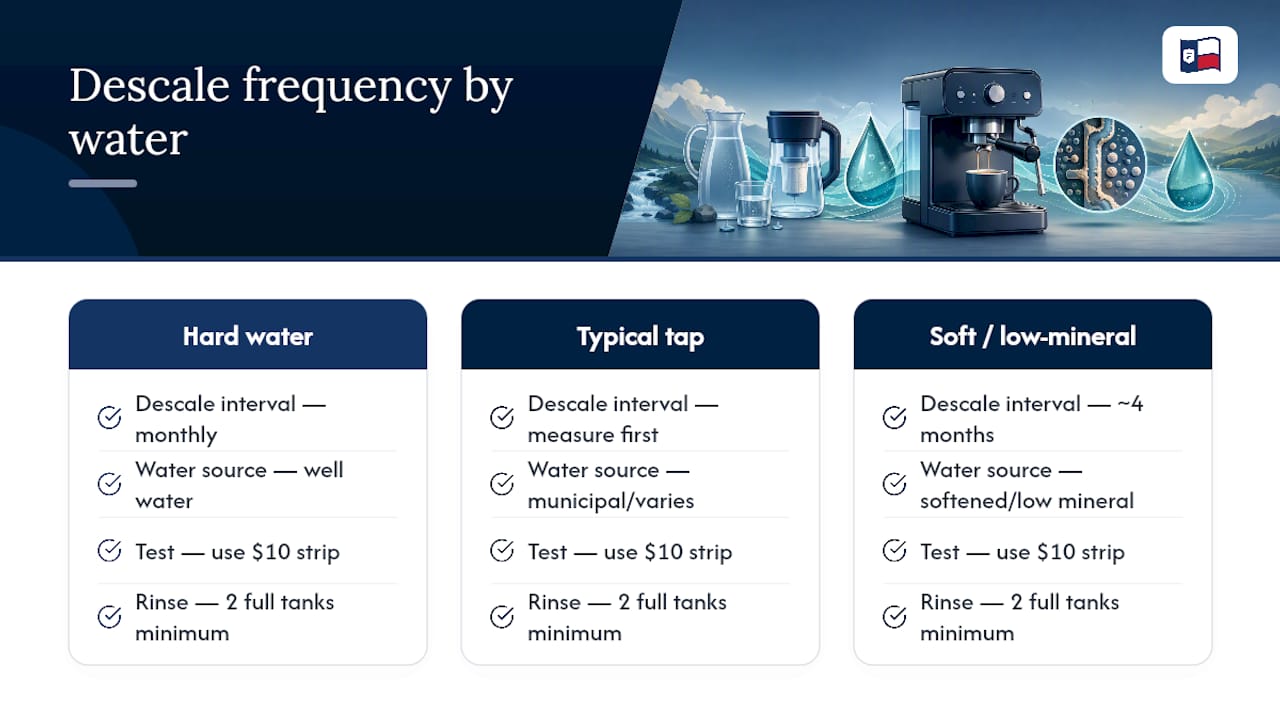
The bigger blind spot is rinsing. People treat it as cleanup, when it’s the step most likely to leave you with a bad cup. Two full tanks isn’t a suggestion, it’s the minimum that actually clears citric residue from the passages.
If you want the one thing to fix first, it’s not your descaler brand. It’s testing your water. Everything else, from your interval to how many rinse tanks you run, follows from that single number.
— Rosario
Keep Your Whole Beverage Setup Running Clean
Descaling protects your machine, but the coffee, tea, and syrups you pour through it matter just as much to what ends up in the cup. Font-mag built its lineup around that idea: small-batch coffee alongside Japanese matcha, MAG Tea loose-leaf selections, and the Sweetbird syrup collection, so your home setup covers more than just espresso.
If descaling has you thinking about diversifying what you brew, Font-mag’s matcha collection is worth a look, especially the Rishi Tea Bulk Barista Matcha for anyone wanting café-quality matcha lattes at home, paired with a bamboo whisk for proper texture. And once your machine is clean and your shots are back to full strength, Font-mag’s flavored coffee lineup gives you something new to run through it. Orders over $35 ship free, so it’s an easy way to restock your setup in one trip.
Sources
- How to Descale an Espresso Machine — Espresso Advice
- How to Descale an Espresso Machine: Complete Guide — Home Espresso Lab
- Descaling the KitchenAid Espresso Machine — ProductHelp (KitchenAid)
- Things you should never clean with vinegar — Consumer Reports
Recommended
- Cafiza 20 oz container espresso cleaner – Font Coffee Roasters
- Why Espresso Is Concentrated Coffee: A Home Barista Guide – Font Coffee Roasters
- Moka Pot Grind Size: Dial In Medium-Fine for Balance – Font Coffee Roasters
- Rinza Milk Frother Cleaner Tablets # 12-M61-UX120-12 (for Newco Cafe E – Font Coffee Roasters