

7 Steps to Preserve Flavor: Clean a Coffee Airpot for Home & Café
Rinse your airpot with hot water after every emptying, then do a full weekly clean that includes pulling the pump stem and scrubbing it separately. Add a monthly descaling if your water is hard or you use the airpot daily. Never submerge the unit or run it through a dishwasher, and skip abrasive pads or harsh chemicals like bleach. That’s the whole routine.
TL;DR:
- Regularly remove and scrub the pump stem with a dedicated brush to prevent coffee oils and off-flavors from building up inside the narrow tube.
- Descale with vinegar every one to three weeks in hard water areas, and rinse thoroughly to avoid residual taste or white mineral residue.
- Clean the outside with a damp microfiber cloth and avoid abrasive scrubbers or harsh chemicals that could damage the stainless steel finish.
- Boost cleaning frequency for high-usage environments, like cafés, to weekly or twice-weekly, especially if white scale appears or the pump becomes sluggish.
- Never submerge the airpot or use a dishwasher, and always store it with the lid open to prevent mold, odors, and damage to the vacuum seal.
Table of Contents
- How Do You Clean a Coffee Airpot Step by Step?
- How Do You Descale and Deep-Clean an Airpot?
- How Do You Clean the Pump and Spout?
- How Often Should You Clean a Coffee Airpot?
- What Should You Never Do When Cleaning an Airpot?
- What Tools and Cleaners Work Best for Airpots?
- What Do Manufacturers and Product Experts Recommend?
- Should You Clean Airpots More Often in Hard Water Areas?
- How Do You Clean the Outside of an Airpot Without Ruining the Finish?
- How Do You Stop Mold and Odor From Building Up Inside an Airpot?
- What Brushes and Tools Actually Reach Every Part of an Airpot?
- Why Routine Care Beats Emergency Cleaning
- Where to Buy Reliable Cleaning Supplies for Your Airpot
- Sources
How Do You Clean a Coffee Airpot Step by Step?
A clean coffee airpot starts with a routine, not a scramble. Here’s the sequence that actually gets both the liner and the dispensing mechanism clean, not just the parts you can see.
- Empty and rinse with hot water. Dump any leftover coffee, then fill the airpot about a third full of hot (not boiling) tap water.
- Pump several strokes (around 10 strokes). This flushes hot water through the internal tube and nozzle, not just the liner, which is the part most people skip.
- Remove the pump stem. Most airpots let you twist or lift the pump assembly out from the top. Set it aside.
- Wash the stem with a soft brush. A small stem or pipe brush and warm, soapy water clear out the oil buildup that collects inside the narrow tube.
- Scrub the liner with a soft carafe brush. Work the inside walls and bottom seam where grounds and oil settle. Skip anything abrasive.
- Reassemble and flush. Put the pump back in, add hot water, and pump several more times to clear out any leftover soap.
- Dry with the lid open. Set the airpot upside down or open on a towel until it’s fully dry inside.
The pump stem is the part most home users forget entirely, and it’s exactly where retained coffee oils cause off-flavor even after the liner looks spotless. A rinse handles surface residue. The stem is where stale flavor actually hides.
Pro Tip: Keep a dedicated stem brush next to your airpot instead of digging through a junk drawer for it. If the brush isn’t within arm’s reach, that step gets skipped, and skipped steps are how off-flavors creep back in.
How Do You Descale and Deep-Clean an Airpot?
Mineral scale builds up slowly, then one day your coffee tastes flat and metallic and you’re not sure why. Descaling with distilled white vinegar fixes that without introducing anything harsh to a food-contact surface.
- Mix about 2 tablespoons of vinegar per airpot of hot water.
- Let it sit anywhere from 1 hour to overnight, depending on how much buildup you’re fighting.
- Flush thoroughly afterward. Pump the solution out, then run several more rounds of plain hot water until no vinegar smell remains.
For a deeper commercial-style clean, running a cleaning pouch through the brewer works well: place the pouch in the brew basket, run a cycle so the solution brews directly into the airpot, then let it soak overnight before rinsing.
Vinegar at roughly a 2-tablespoon dose per airpot is enough to break down mineral scale without leaving a lingering taste, provided you rinse it out completely. If your coffee still tastes off or you see visible white residue after descaling, it’s time to escalate to a commercial cleaner rather than repeating the vinegar soak.
How Do You Clean the Pump and Spout?
The pump and spout are mechanical, so treat them that way. Rough handling here is what kills an airpot early.
- Twist or lift the pump assembly free from the lid, following whatever release mechanism your model uses.
- Separate the stem from the nozzle housing where the two parts allow it.
- Scrub both with a small stem or pipe brush and warm, soapy water, working the brush all the way through the tube.
- Pump a mild cleaning solution through the reassembled unit multiple times to flush the full dispensing path.
- Inspect the rubber seals for cracking before you put everything back together.
- Reassemble, then test the pump action and watch the base for leaks.
Manufacturer care guides consistently call for this multi-stroke flush because a quick rinse doesn’t reach the internal tubing. If a stem looks bent or a seal is cracked, replace the part instead of forcing it back together. A warped stem won’t seal properly no matter how well you clean it.
How Often Should You Clean a Coffee Airpot?
Frequency depends on how hard your water is and how often the airpot gets used, but the baseline holds for almost everyone.
- Daily: rinse with hot water after every emptying.
- Weekly: full clean with the pump stem removed and scrubbed separately.
- Monthly: descale if you notice mineral buildup or your water runs hard.
Watch for warning signs that mean you shouldn’t wait for the calendar: off-flavors in the coffee, visible white scale on the liner, a pump that suddenly feels sluggish, or cloudy water sitting in the base. A busy café pumping dozens of airpot cycles a day needs this schedule tighter than a home kitchen running one pot a morning, but the core rhythm of daily, weekly, monthly doesn’t change.
What Should You Never Do When Cleaning an Airpot?
A few habits ruin an airpot fast, and they’re common enough that they’re worth spelling out plainly.
- Never submerge the airpot or run it through a dishwasher. The vacuum seal and pump mechanism fail under dishwasher heat and full immersion, and once that seal is compromised, insulation performance drops permanently.
- Skip abrasive scrubbers and harsh chemicals. Steel wool, scouring pads, and products like chlorine bleach or CLR scratch the liner and degrade rubber seals, and those scratches become permanent harbors for coffee oil and bacteria.
- Pre-warm glass-lined units before adding hot liquid. A cold glass liner can crack from thermal shock. Warm it with lukewarm water for a few minutes first, and never chill it with ice or dry ice.
- Store with the lid open. A sealed, damp airpot left overnight is exactly the environment that breeds musty odors and bacterial growth.
Pro Tip: If you’re tempted to reach for whatever’s under the sink to fight tough stains, don’t. A cleaner strong enough to strip scale is usually strong enough to pit the liner, and pitted liners never fully clean again.
What Tools and Cleaners Work Best for Airpots?
The right supplies are simple, and you probably already own most of them.
- A soft carafe or bottle brush for the liner interior, rinsed and air dried after each use so it doesn’t grow its own bacteria.
- A small stem or pipe brush sized to fit inside the narrow pump tube.
- Mild dish soap for everyday washing.
- Distilled white vinegar for routine descaling.
- A commercial cleaner for deeper deep-clean tasks or stubborn mineral deposits, including single-use packets like Urnex Clearly Coffee, which dissolves in hot water for a short soak before rinsing.
A dedicated Cafiza urn cleaner is a convenient option when you want a commercial product instead of a kitchen-cabinet fix. Whatever you use, a lint-free towel for drying and an open shelf for storage round out the setup. Nothing here needs to be fancy. It just needs to get used consistently.
What Do Manufacturers and Product Experts Recommend?
Cleaning an airpot properly isn’t just about hygiene, it’s about protecting flavor. Font-mag’s Coffee Degassing Explained piece covers how residue and staling interact with fresh beans, which matters more than most people realize once you understand how quickly rancid oil in a dirty stem can undercut a good roast. For readers building out a full home setup, the Home Barista Ingredients guide is worth a look, too. Font-mag carries Cafiza urn cleaner for readers who want a dependable commercial-grade option on hand for deep cleans.
Should You Clean Airpots More Often in Hard Water Areas?
Water hardness changes everything about your cleaning math. If you’re on municipal water with high mineral content, scale builds up inside the liner and pump tube faster than the standard monthly schedule accounts for, and you’ll likely need to descale every two to three weeks instead. Softened or filtered water stretches that interval out, sometimes to six weeks or more, because there’s simply less mineral load settling out of the water each time you brew.
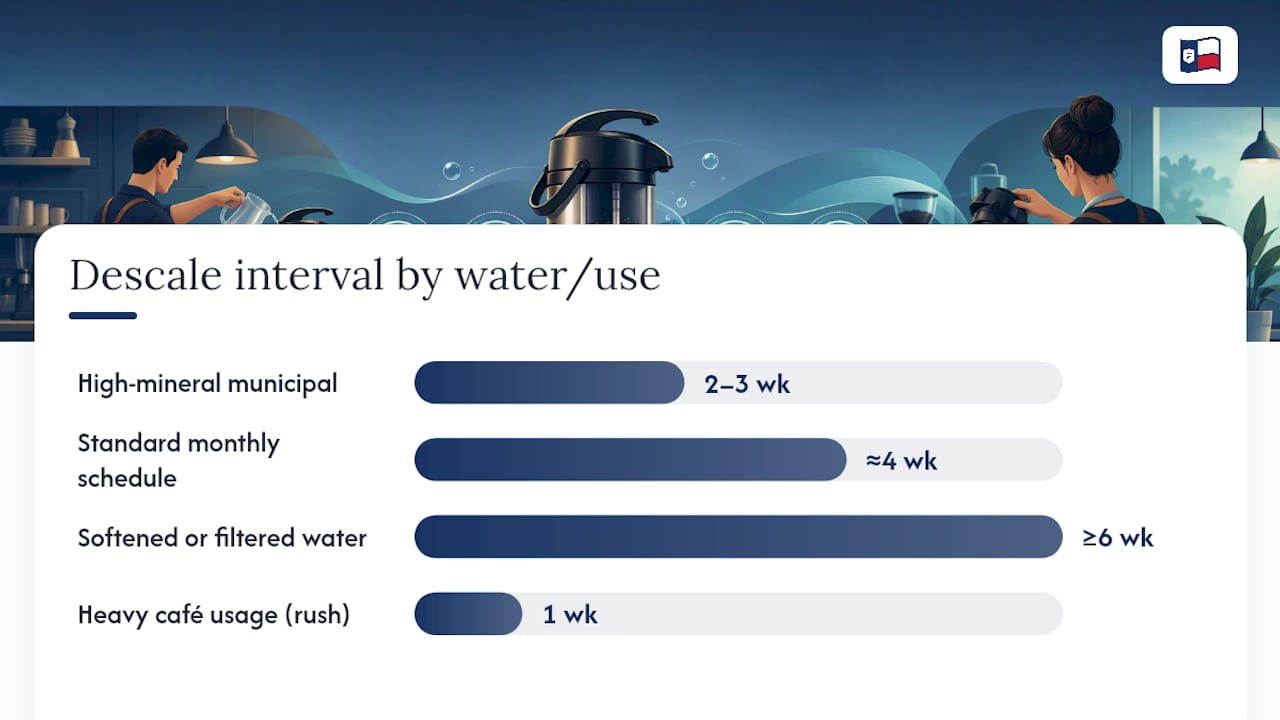
Usage intensity matters just as much as water chemistry. A single airpot brewed once a day in a home kitchen accumulates oil residue at a fraction of the rate of one that gets refilled and dispensed from six or eight times during a café’s morning rush. If you’re running an airpot at that pace, the weekly deep clean isn’t optional. It’s the minimum, and you may find twice-weekly stem removal keeps flavor more consistent.
The smartest approach is to treat the daily, weekly, monthly schedule as a floor, not a fixed rule. Watch the actual signals: if you’re seeing white residue on the liner walls within two weeks, or the pump feels noticeably stiffer than it did a month ago, that’s your water and your usage telling you to tighten the interval. Conversely, if you’re a light user with soft water and everything still looks and pumps clean at the four-week mark, there’s no reason to force an early descale. Let the airpot’s own condition set the pace rather than a generic calendar.
How Do You Clean the Outside of an Airpot Without Ruining the Finish?
The exterior takes a different kind of care than the inside, mostly because the goal shifts from removing coffee residue to protecting the finish itself. Stainless steel exteriors, which cover most airpots on the market, respond well to a damp microfiber cloth with a small amount of mild dish soap. Wipe with the grain of any brushed finish rather than in circles, since circular motions on brushed steel tend to leave faint swirl marks that show up under kitchen lighting.
Skip anything abrasive on the outside just as firmly as you would on the inside. Steel wool, scouring powders, and bleach based cleaners strip the protective finish on stainless steel and can dull it permanently within a few cleanings. Glass cleaner sprays are fine for any glass viewing windows on the lid, but avoid spraying directly onto plastic buttons or the pump mechanism, where liquid can seep into the internal workings.
For the base, unplug electric models before wiping down the bottom or any control panel. A barely damp cloth is enough. Water pooling around an electrical connection point is a bigger risk than any smudge you’re trying to remove. Dry the exterior fully after wiping, since leftover moisture around seams and handles can leave water spots on polished steel or, worse, work its way into small gaps and contribute to the same odor problems you’re trying to avoid on the inside.
How Do You Stop Mold and Odor From Building Up Inside an Airpot?
Musty smells inside an airpot almost always trace back to one thing: moisture trapped in a sealed space with organic residue to feed on. The fix starts with the same habit mentioned earlier, storing the airpot with the lid open after every wash, but a few additional practices make odor problems far less likely to start in the first place.
Dry the interior completely before closing it up for storage, even overnight. A quick air dry with the lid propped open for an hour usually isn’t enough if there’s still condensation clinging to the pump stem or the underside of the lid. Wipe those spots with a clean towel before you walk away.
If you already have a faint musty smell, a vinegar soak does double duty here beyond descaling. The same 2-tablespoon dilution used for mineral buildup also breaks down the biofilm that causes lingering odor, and a full overnight soak followed by a thorough rinse usually clears it. For a smell that persists after that, a baking soda and water paste left inside for a few hours before rinsing can pull out what vinegar alone didn’t touch.
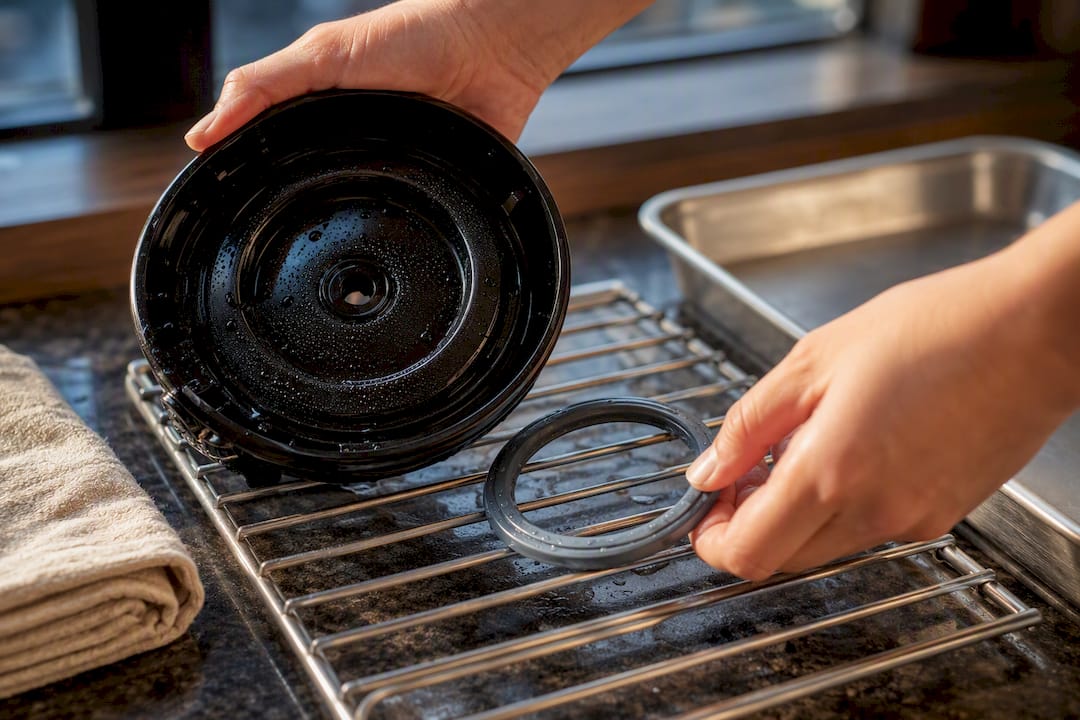
Pay attention to the rubber gasket around the lid, too. It’s a common odor trap because it’s rarely removed during a routine wash. Pop it out during your weekly clean, scrub it separately, and let it dry fully before reseating it. A gasket that’s always slightly damp is a standing invitation for mold to take hold, even if the rest of the airpot looks and smells fine.
What Brushes and Tools Actually Reach Every Part of an Airpot?
The tools that matter most are the ones sized for the airpot’s tightest spaces, not general kitchen scrubbers. A standard sponge cleans none of the parts that actually cause off-flavor, because it can’t reach into the pump tube or around the base seam where the liner meets the housing.
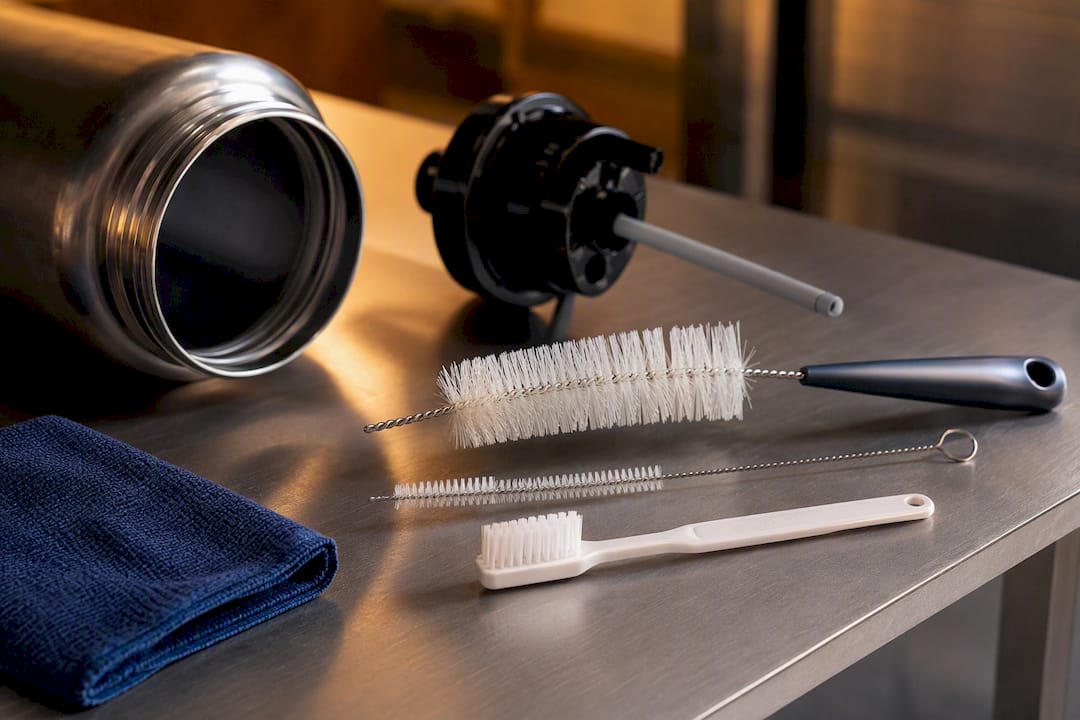
A soft-bristle bottle brush with a long, flexible handle is the workhorse for the liner itself, reaching down to the bottom curve that a sponge or short brush skips entirely. Look for one with a bent or angled head, since a straight brush often can’t follow the curve of a tall airpot liner all the way to the bottom.
The pump stem needs something narrower still. A thin pipe cleaner style brush, often sold for baby bottles or hydration tubes, fits the internal tube diameter on most airpot models and pulls out the oil residue a wider brush can’t touch. Keep this brush dedicated to the airpot rather than sharing it with other kitchen tasks, since cross contamination with grease or food residue defeats the purpose.
For the gasket and seams, an old, soft toothbrush handles the fine detail work well, getting into the grooves where a bigger brush just glides over the surface. Whatever brushes you choose, replace them the moment bristles start to splay or fray, since a worn brush stops reaching the tight spots it was bought for and starts just pushing residue around instead.
Why Routine Care Beats Emergency Cleaning
I’ve watched enough coffee go flat from a dirty pump stem to know the fix is almost always boring: rinse it, scrub it, dry it, repeat. The airpots that taste off aren’t victims of bad beans. They’re victims of a skipped weekly clean. Pair a steady cleaning habit with a fresh rotation of beans and tea, and the difference in your cup is bigger than any brewing trick.
— Rosario
Where to Buy Reliable Cleaning Supplies for Your Airpot
You don’t need a cabinet full of specialty products to keep an airpot clean, but having one dependable commercial cleaner on hand saves you when vinegar alone isn’t cutting through stubborn scale. Font-mag carries Cafiza urn cleaner in single packets for occasional deep cleans, plus a 20-ounce bulk container if you’re running multiple airpots in a café setting and don’t want to reorder every month.

Cafiza is formulated to break down coffee oil and mineral residue on food-contact surfaces without leaving the harsh chemical aftertaste some general-purpose cleaners do. Grab a packet alongside your next coffee order; check the supplier’s site for current shipping details. While you’re restocking, it’s worth glancing at Font-mag’s flavored coffee selection or the matcha lineup if your rotation could use something new. A clean airpot deserves a fresh pour.
Sources
- Best Practices: Caring For Airpots - Foodservice Equipment Reports Magazine
- Glass Lined Airpot Use and Care Guide
- How To: Properly Clean an Airpot - Service Ideas blog